Facebook Badge

Saturday, February 2, 2013

EBOOST Natural Energy Review!

Earlier this month after a very long wait, i finally got in the mail my Influenster Holiday Voxbox 2012, and one of the goodies i found inside was an EBOOST sample .


I was inmediadtly excited  since i am very into all this type of water enhancer powders.
I am also very curious/cautious about the stuff that i drink/eat/wear. so i went a head a did my own research to see exactly what i was getting myself into before i even tried it...
Well i found out that not just is an all natural product but that it also offers a bit more than any other product of this kind in the market at the moment! They claim to have goodies as:  Vitamin B-12, Vitamin c, Vitamin D, Green tea, Acid Folic (that has so many benefits), Quercetin, 5-HTP, Resveratrol, huperzine-A, among other things all compacted into one little envelope! I also found that the EBOOST is sweeten with Stevia  which is a plant not a chemical! and that its Gluten and Soy Free!
Anyway... it comes in two presentations: As an easy to mix powder and as a shot. And in four different flavors:  Orange, Pink Lemonade, Acai Pomegranate and Super Berry.

Ok, now... lets go on to my personal experience:
I purred my Pink Lemonade mix into a 12Oz. glass and let it sit for a few seconds to allow it to effervesce,


and then i also added a couple of ice cubes, just so it was chilled, because i am not a big fan of room temperature drinks. ( but i guess that its really up to your personal choice).
Make sure you also stir it up, to make sure the powder is completely dissolved into the water, before you start drinking it.


 The first thing in my mind as i took the first sip was: " Wow!! this thing tastes great!!". It was seriously just like having a real lemonade, way better tasting that those fake ones you get at restaurants and off course way better for you!. This doesn't happen very often where as the stuff that's good for you tastes better than the junk! and it totally comes from EBOOST not having any artificial flavors added!
Sugar wise, in my opinion it was sweeten perfectly , it was a happy medium, not too much to be overwhelming or too little to be too tangy or bitter.


Excuse my washed out face. (No makeup for this girl this morning! :)

It took about 15 minutes for me to start feeling more energized! I can totally see how this would help you not just in your regular life to keep up with the busy days but as a way to keep your workout on point and just make it easier and more enjoyable for yourself. I was literally bouncing off the walls with my little one, we danced and chased each other all over the house! hahahha

But anyway before i get off topic, i'd like to say that this "boost" Lasted for about four hours, and then i started to slow down, did not get sleepy, just simply started to be my old self, lol.

I think this would definitely be worth the investment, and when i say investment .. i mean it, since it can get a bit pricey if you plan in consume it on a daily basis. As it goes for $28 for a box of 20 ct. and $39 for a box of 30 ct. of the effervescent powders. Or $39 for a box of 12ct. shots!

The only thing i am not too crazy about is that it does contains Caffeine (which is what keeps you awake!)
But at the same time i think all the Minerals, Vitamins and super-Nutrients balanced out everything.

I can also see it being a huge help to reach my Workout goals, keeping my momentum everyday, in other words, giving me the energy to actually want to do it!

Overall, i think i would definitely purchase this in the future and not just that, but i would also recommend it to friends.
This puppy gets a 9 out of 10 Score, from me!

Once again, thank you so much for visiting my blog! dont forget to Subscribe up there, so you dont miss any of my updates!
Hope you enjoy the reading.
Big Kisses.
xxx
-Mile.

Disclaimer:
I got this product for free via Influenster.
and i vowed to give my 100% honest opinion.


Wednesday, January 16, 2013

My Influenster Holiday VoxBox 2012 is here!!!!

So... i joined Influenster probably about a year ago, and even tho i have pre-qualified for a few VoxBoxes i had never actually gotten picked to get one until last month!
In early Dec i got an email from them telling me that i was gonna be getting the Holiday VoxBox 2012, so you can only imagine how excited and pumped i was about it!!

It took a while to get to me (a little over a month) but when it finally did (Today) , I really couldn't contain my happiness because It was loaded with so many amazing things!


Anyway... Let's go over each and every one of the goodies i got!!

When i first opened up my box, the first thing that totally caught my eye was the Kiss Nail Dress, which are basically Nail stickers with beautiful patterns and rhinestones , that give you a perfect mani for less the $$$ and less the time as well! (and time saving is definitely a huge plus for me, being a mommy of an 19 month old, im always on the go! lol)


I also got a full size Liquid Lipshine from NYC Cosmetics  in a beautiful "nudey" shade, its actually called "Nude York City!"  Clever, huh? lol


In between all this amazing stuff i also found a familiar Face! i got a Montagne Jeunesse Anti Stress Chocolate Masque and even though i have never tried this particular one, i am very familiar with the brand and to be more specific with this masks. :) 


The next thing i pulled out of this magic box was a weird yet cool looking  brush. It was the Goody QuickStyle Paddle Brush which claims to remove up to 30% of the water on you hair as you style it! I am so deeply excited to try this puppy, i cant even tell you guys, so expect a review some time real soon! :)


Then i found a pretty amazing offer from Sole Society, which is one of those shoe Memberships where you get great quality shoes for an amazing deal. But, yh.. i got a $25 Off my first purchase but the best thing is that anyone can use it! (and by anyone... i mean YOU GUYS!! :D) All you need is this code: INFLUENSTER25
But hurry because this offer ends on Jan 31st!!


I also was sent a Quaker Real Medleys Oatmeal for me to try! i got it in Peach Almond flavor... YUM! that is all i got say about this! hehehe
Im pretty sure my little man will be all over it as well.


And last but not least i got a sample of EBOOST, an all natural energizing effervescent powder that you mix with water.
It claims to Boost your mood as well as your immunity  and help you focus through out the day. So i guess we Shall see how this goes! :) (Gotta get rid of this Mommy Brain! hahaha)


 I am sooo pumped to finally try all this goodies and bring you guys my thoughts on each and every one of them!! So again, be on the look out for Reviews, reviews, Reviews!! 

I hope you guys liked this post and thank you so much for stopping by.
Dont forget to Subscribe, that way you wont miss my updates around here!
Xoxox
-Mile.


Disclaimer:
I received these products complimentary for testing purposes from Influenster.

Wednesday, November 21, 2012

Holiday colorful Look MAKEUP TUTORIAL - Maquillaje Colorido Para Fiesta! TUTORIAL y lista de productos!


Well hello there lovelies,
Today i just wanted to share with you guys my latest Makeup Tutorial, it is very Colorful and dramatic!
This is definitely not your go-to Holiday look, But hey! I decided to do something for all those girls (like myself) who are not afraid to rock a bright look in public! :) So Bright Makeup Lovers.. Here you go!!!


Bueno Mis amores,
Hoy quise compartir con ustedes mi ultimo tutorial de Maquillaje, el cual es bien colorido y dramatico!
Este definitivamente no es un look para todos los dias, pero decidi crearlo de todas maneras para todas esas chicas (Que como yo) No le temen a los maquillajes de tonos fuertes/coloridos. Bueno y aqui les va!


The products that were used are the following :
Los productos usados fueron los siguientes:

Eyes/Ojos:
Nyx Eyeshadow Base in White.

My Beauty Addiction Mineral Shadows in:
Pharaoah's Gold (Inner corner of the eye/Esquina interna del ojo)
Passion-fruit (Pink color in the eyelid/ tono rosado en el parpado movil)
Alter Ego (Purple on the Mid-Lid/ tono morado en el centro del parpado movil)
Graffiti (Blue on the brow bone/Tono Azul en el hueso de la ceja)

For the crease i used Wet N' Wild's Comfort Zone Pallet . Last color on the second row.

Para definir la cuenca utilize la paleta Comfort Zone De Wet n' Wild. Ultimo color de la segunda fila.

Highlight is the white Shade from my Milani Runway Eyes Pallet in Haute Couture!

Y para iluminar mi look utilize el tono blanco de mi paleta Runway eyes de Milani en Houte Couture!

Eyeliner/ Delineador:
LA colors Liquid Liner / Delineador Liquido de LA colors.

Mascara/ Pestañina:
Falsies from Maybelline.

Face/ Rostro:
Laura Gueller Real Deal Concealer
Cover girl mineral powder foundation
ELF's Blushing and Bronzing Duo
ELF's Mineral Blush in Peachy.
ElF's Shimmer pallet.


 Last but not least, here it is the actual tutorial, i Hope you guys dont mind that the Vol is so low! but i have been a  little sick and i didnt even realize how low i was talking on the Mic.
But if you turn your speaker all the way up, you would be able to hear, i promise!!


Thank you so much for stopping by... Dont for get to Subscribe up there!
See you all next time.
Xoxox.
Mile.


Saturday, October 20, 2012

Angel Contacts GEO Magic Black from the Magic-Series REVIEW

Hola Preciosas!
In today's post, i wanted to talk about a pair of Circle Lens that i recently got in the mail from Angel Contacts.

This company  has a huge variety of styles for every taste, from Natural to Spooky (as they call it) Which by  the way if you  are interested or looking to get some contacts to give your costume an extra impact effect this coming Halloween, they have a few styles on Sale! And if you order by the 21st, they guaranty you, You will get them at your door step before the big day!!  So hurry their way and get yours right here!


I am really exited to bring you guys this review and i hope you  find it real helpful!
So let's get started!


First let's talk about their packaging!


They come in a little plastic envelope type thing (as you can see above!), very cute and practical; In which inside you will find:
Their Business card, a thank you Note; Which is also instructions in how to open the little containers where your lenses come in.
Instructions in how to apply your contact lenses, which really come in handy if you are a newbie!
 A plastic lenses Case (Mine were Clear and Pink! <3) and of course your lens. This ones come in small injection vials, how cool!!
Their S&H was very quick, and the packaging was great (as you can see, they made their way in one piece )


As i was saying above they have a huge variety of lenses, to be more exact six Collections! which usually go for $25 Us Dollars.
It was soo hard for me to decide on which ones i wanted to order but after a couple days of just staring at all of the contacts i went ahead and got the GEO Magic Black from the Magic-Series (<-- Click there to go check them out!)

They are real cool looking and they give you an effect that is quite difficult to describe, i'd say... Mysterious!
These  have a black rim all along the edge with some type of spikes pointing towards the pupils!
Here is a pic of them...


 I think my most favorite thing about this style is that people can't really tell you are wearing them (as with most colored ones) but they still give you that "Je ne sais quoi" Look, that was exactly what i was looking for!
Although i did find them to not look on my eyes quite as they do in the pic of the catalog/website, I understand that, that is just a very variable factor, since they look totally different depending on your eye color. (mine in this case, being a little too dark) But like i said before i lovee them!

They are actually very comfortable, there was a few days that i wore them for over 6 hours straight and they didn't give me red eyes at all, which is pretty cool, if you ask me.. Also there is no blurriness when you are wearing this contacts, definitely a plus for me! You might feel your eyes get a little dry after a while but that is normal with any contacts of any brand, so if you are gonna wear them for a few hours i recommend you to bring along your Visine! hehehe.


Before i go i wanted to share with you guys a few pics of me wearing the GEO Magic Black from Angel Contacts


Dont forget to visit: AngelContacts.com!
Thank you so much for stopping by...
Dont forget to Subscribe/Follow!
Huge Kisses for you!
XXX
-Mile.

Sunday, October 14, 2012

Golden Brown Smokey Eye - Look Dorado y Cafe Ahumado TUTORIAL!!


Hey girls... today i just wanted to share this super cute look i did a few days ago, if you follow me on fb, you probably saw i posted a few pics earlier this week. if you are not following me you can find me right Here!!!


Any who... This is the kinda look i used most of the times i go out at night. ( If i dont have enough time to do anything more elaborate, anyway.... hehehe)
I hope you guys like it!
Here it is the video tutorial where you can see how i created and the list of products that were used!


Productos usados/ Products used:

Rostro/ Face: 


Base liquida/ Foundation: Beauti Control Tight Firm Fill Foundation SPF 12 N-2 

Corrector/ Concealer: Glamoufage    
Rubor/ Blush: Wet n' Wild : Mellow Wine (FLora Collection)

Bronceador/ Bronzer: ElF Bronzing Duo

Iluminador/Highlighter: ELF Shimmer Pallete


Ojos/ Eyes:

Base de Sonbras/ eyeshadow Base: NyX in white
Sombra iluminadora/ Highlight: LA Splash illuminating in Exposed
Trio de sombras/ Eyeshadow Trio : Beauti Control Mineral shadow trio in Sultry
Delineador/Eyeliner: LA Colors Liquid liner in Black
Pestanina/ Mascara: Maybelline Falsies in black
Delineador de ojos/ Eyeliner pencil: LA Colors Jumbo Pencil in White

Cejas/ Eyebrows: 

Delineador de cejas/ Brow Pencil: LAncome Le crayon poudre brow pencil in brown.
                                                  ELF Eyebrow Kit

Lips:

Labial/ Lipstick: Sephora Lip Attitude. 


Thank you so much for stopping by...
Dont Forget to Follow my blog! :):)
Xoxox
-Mile.

Friday, September 21, 2012

HOW TO: Owl Nail Art. Como Hacer Un Buho En tus Uñas . **TUTORIAL**


Today we are gonna be creating beautiful Owls in our nails!
I saw this idea a few weeks ago on instagram (dont forget to follow me in Instagram at Mileparis) and i just had to do it my self. Although i did not used their step by step, i did my own.

So let's get started....
We are gonna need: 
  •  different color Polishes. i chose a very colorful Gama just because that how i am! lol
  • A Dotting Tool.
  • your beautiful nails!! ( i did it in this fake nail i had lying around by itself! LOL Since it would be easier to show you guys)
  • And a surface where you could put you polishes down for you dotting tool.
----------------------------------------------------------------------------------------------------------- 
Hoy Vamos a crear un hermoso Buhito en nuestras  Uñas !!!
De hecho vi esta idea hace algunas semanas en instagram (por cierto... no te olvides de seguirme ==> Mileparis) y tuve que hacerlo yo misma, aunque no utilice la misma tactica, que la chica en IG, yo hice la mia propia.

Ok... Vamos a empezar...
Vamos a necesitar:
  • Pintaunas de differentes colores. yo escogi una gama bien colorida, como podran ver. lol
  • Algo con que hace puntitos. 
  • Tus  uñas  porsupuesto! ( yo utilize esta  uña postiza, para que fuera mas facil, tomar las fotos)
  • Y por ultimo, algo donde puedas vertir tus pintauñas.


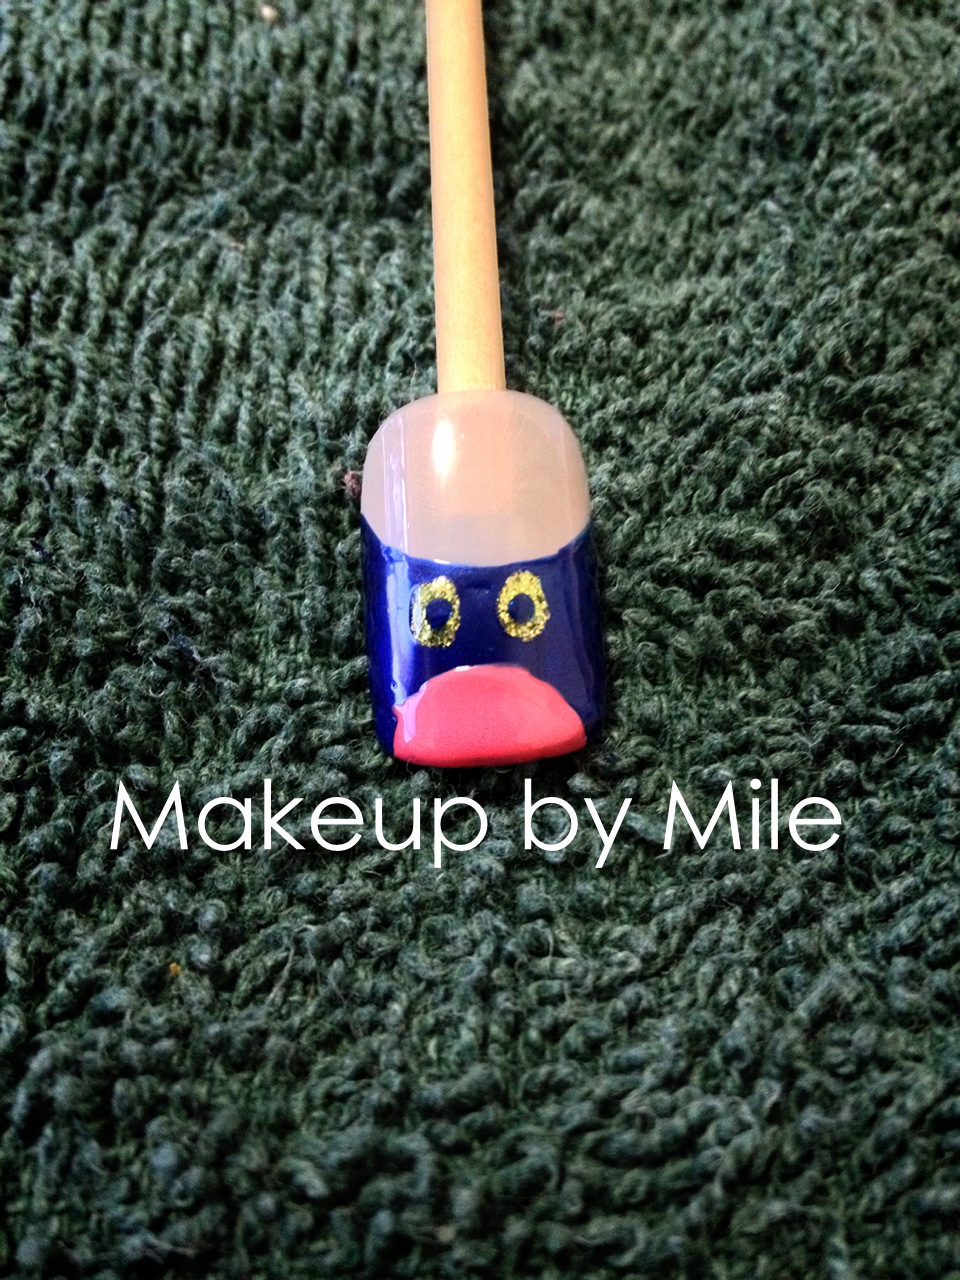
1) First we want to choose the color we want our little owlie to be! i chose Dark (navy) Blue. and we want to create a crescent type of shape right in the middle of your nail and paint the outer half of it.
Like so...
-----------------------------------------------------------------------------------------------------------
1) Primero queremos escoger el color del que vamos a hacer el cuerpito de nuesto Buho, Yo escogi este azul oscuro. luego vamos a crear una forma de media luna, en la mitad de nuestra uña, y pintar de alli, hacia el extremos de afuera de nuestra uñas.
como lo podran ver en la siguiente foto...


2) A second coat was in call for this one!! :)
-----------------------------------------------------------------------------------------------------------
2) Luego vamos a aplicar una segunda capa de este esmalte. :)


3) Now we want to create the eyes...
I poured a little bit of the lime shimmery green polish on a safe surface, and using my dotting tool, did them.
------------------------------------------------------------------------------------------------------------
3) Ahora crearemos los ojitos...
Verti, un poco de mi esmalte verde lima escarchado en una superficie, y luego usando mi herramienta para hacer puntitos (no necesitas esto, puedes usar la cabeza de un alfiler o hasta un palillito!) , los hice.


4) Pouring a few drops of the same navy blue i used for the body of my owl, and using my dotting tool again. I placed the pupils! How Adorable!
------------------------------------------------------------------------------------------------------------
4) Ahora vertiendo unas cuantas gotas de el mismo esmalte azul oscure que utilize para el cuerpecito, utilizando mi herramienta para hacer puntitos de nuevo, le hare la pupilas!
Divinoooooooooo!!!!!


5)Now taking a bright color, we are gonna draw half an oval and this gonna be his belly!
I chose this Hot Pink, because it just looked sooooo cute!
------------------------------------------------------------------------------------------------------------
5) Con un color brillante que contraste con el fondo, vamos a hacer medio ovalo, y este va a ser su barriguita!
Escogi este fucsia, porque me parecio que se veria hermoso!


6)Take your yellow polish and draw a small little triangle type of shape, right in between his eyes and make sure is right on top of his tummy!
--------------------------------------------------------------------------------------------------------
6)Con un esmalte amarillo, crea su pico! Solo haz un triangulo en medio de sus ojos y justo encima de su panzita!


7) Go back to you dotting tool, and do what it does best... DOTS! LOL
in this case i chose a light blue shade and white (to give it a little bit of dimension)
-----------------------------------------------------------------------------------------------------------
7) Vuelve a tomar tu herramienta para hacer puntitos y haz muchisimos en la barriguita de nuestro Buho.
En este caso escogi un tono azul claro y blanco para crear sombras y darle un poco mas de dimension.


Last i just gave it a little more of detail, drawing the moon and the stars but that's optional ( since it deppends on how long your nails are, you don't want tit to be to crowded.)
And we are done!!
Here you have a cute little Owl!
------------------------------------------------------------------------------------------------------------
Por Ultimo, decidi darle un poco mas de detalle, dibujando una Luna y estrellas, pero eso es opcional ( porque depende de que tan largas esten tus unas)
Y hemos terminado!!
Aqui lo tienen... un hermoso Buhito!


Thank you so much for stopping by...
don't forget to hit the Follow Button up there!!
Much Love
-----------------------------------------------------------------------------------------------------------
Muchas gracias por pasar por mi blog!
No se olviden de darle click al botoncito de Follow, en el lado derecho.
Con tod mi cariño.

Xoxox
-Mile.

Friday, August 31, 2012

ISZO Circle Lens - (iszofashion) GRAY **REVIEW**


Well i was lucky enough to have the opportunity to try out a pair of  the new series lenses  from ISZO Circle Lens!,  An Amazing store/Company i found out about by chance on Facebook. But they actually also have their own website which you can find right Here! They are based in Malaysia But they ship worldwide and i must say the shipping  to the US is crazily fast!
They have so many different styles and colors to choose from in stock... it was extremely hard for me to decide what i wanted to get BTW,  but i finally went ahead and got a gray shade ( which i was already comfortable with since i did own a pair of  gray three color blend lenses in the past) I am gonna go ahead and show you guys what they look like!


Now speaking of the packaging they come in this little glass jars completely wrapped in bubble wrap to protect them during shipping and handling. You will also get the cutest little case for them, they come in different assorted motives ( mine were little chicks, sooo adorable!!!!) I will be showing you just about... Now!!!


Well the first time i tried them i was very surprised and pleased! i almost couldn't even feel them, they're very comfortable. And for my experience with other brands i've tried in the past where the lenses would just blur out most of my vision, this did not happen with my ISZO Circle Lens!! At all!!
Price wise they are very inexpensive! they go from $19 to $22 dollars! They are really easy to get on, and they do not dry out my eyes. And i feel very comfortable applying my makeup with them on!
The color is very nice, even in my dark brown eyes!
Here' s a few pics of me wearing them...
First one with my "No-MAkeup, Makeup! and the second one with a very dramatic Look! 


You should also go check out my tutorial in how i created this beautiful Dramatic Look! 


I hope you guys liked Today's post and we will be in contact really soon!
XOXOX
- Mile.
                                   FB:      ISZO Circle Lens - (iszofashion)